A Morgan Rushworth Steelworker is an important piece of equipment for any workshop, and can see a lot of work throughout the day, obviously with such a workload, then tooling, top punches and bottom dies are likely to be regularly changed, and sooner or later that job will fall to you.
Whether it is something you’ve done a thousand times, or something you might be nervously anticipating for the first time, it is essential to follow the right steps, safely and diligently; to avoid damage to the machine or materials and injury to you and your colleagues.
As with all jobs involving heavy machinery, the first thing on your mind before touching a single thing is ‘Is it turned off?’ If it is, and your PPE is all in place, then you can make a start.
At this stage the two things on your mind need to be ‘assumption and alignment’. Alignment of the tooling is essential. Assuming that it is… Well that simply isn’t an option; you need to be certain, by installing a standard square or round punch and die.
To do this you need to access the bolster by removing the machine’s front and rear plates and the backgauge, remove the guard and the stripper plate and you have access to any existing punch and die, for safe removal with the correct tools.
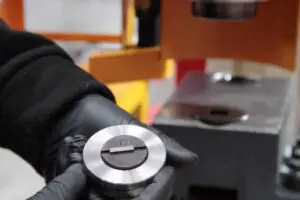
When they are removed, repeat the steps in reverse to fit your desired top punch and bottom die, at this stage the machine should still be turned off, it isn’t necessary to start thinking about turning it on until the tools need to be aligned, when they are fitted check carefully, and check again, don’t be afraid to take your time at this stage, it is essential to get it right.
When you are happy with your visual check from all sides, turn the machine on in inch mode, this will slow the speed of the punch. Ensure it can be driven into the die without any resistance or collision, again at this stage check carefully that there is an even gap on every side of the die. When you are happy (and only then) tighten up the bolster’s six m12 bolts.
Whilst tightening the bolts, don’t make the mistake of assuming the job is nearly done, tightening moves components and can change alignment, it is important to check after every simple turn that nothing changes position, if the bolster moves, the tooling will be out of alignment, any tap with a copper hammer has to be careful, and every turn of every bolt needs your full attention.
Once the punch and die are aligned, switch the machine on, check again that alignment is correct by driving the punch down slowly into the die, always bear in mind the damage a collision could do, with so much power and energy focused on such a small area. Only when you are happy; start to build your machine back up, refitting the stripper plate, the backgauge, the rear and front plates and the safety guard, safely and methodically.
At this stage we can be confident that our punch and die are aligned, however even when changing tooling it is essential to firstly check the alignment in inch mode, bringing the punch down slowly to check carefully for any collisions, even if no one else has used the machine.
For a visual guide on how to safely remove and install a punch and die on a Morgan Rushworth Steelworker, click here.
Published 21st July 2017