Cutting to the correct size is, as you probably know a very big deal…A correctly calibrated backgauge on your guillotine is vital, with our optional Elgo control, calibrating and re-calibrating is a simple and straightforward process allowing you to achieve the accuracy you need. Over on our YouTube channel our knowledge base engineer has provided you with a visual walk through of how to get it right the first time, every time and to make sure you are cutting to the correct size.
The first thing to do is to establish the parameters of where exactly the backgauge is programmed to. To do this you will need to take a piece of metal and do a test cut. For the purposes of our demonstration we cancelled the figure already programmed in the controller and have set the backgauge to 50mm, which is an easy, standard measurement to work from.
To test whether your controller and backgauge are calibrated together you must first place the sample piece of metal on the guillotine and push it up against the backgauge to take a cut. Collect the cut piece from the back of the machine and simply measure it, as accurately as you can.
In the video, you will notice that the piece we cut measures 28.66mm which is quite a way short from the 50mm we asked for…Time for some re-calibration!
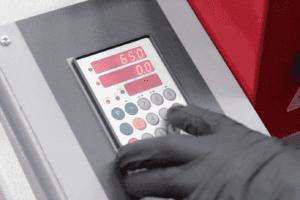
To amend this measurement, press and hold the ‘F’ button on the controller for 3 seconds. Then type 98 into the controller and then the forward arrow. At this stage to change the measurement in the controller you will need to use the code 250565, and then pressing the forward arrow will automatically unlock the parameters.
Type 07 and press the forward arrow. The size of the material that we measured earlier was 28.66mm. We will input that figure here and then press the forward arrow. To exit out of the parameters press F and then press F again for 3 seconds to come out of the settings.
In the parameter category type 07, press the forward arrow and then F again. The top screen will change and depict the data and the figure you’ve programmed in. To test your measurements, turn the machine on by pressing start and take another cut. Measure the material. In our demonstration, the piece is coming out at 50.02mm, which is accurate enough for any guillotine.
Following these simple steps will ensure your backgauge is exactly where you need it with a process that takes less than a couple of minutes…
For more information on our range of hydraulic guillotines, The Elgo NC backgauge and for help and advice on calibration, click, tap or call us on +44 (0)1432 346 580, email [email protected] or get in touch via our website
Published 10th March 2017