
This guide explains how to program tooling into the ESA 875 press brake controller. The process covers loading tooling from directories, using a memory stick, and manually drawing tooling. The same principles apply to other ESA models such as the ESA 640.
Accessing the Tooling Library
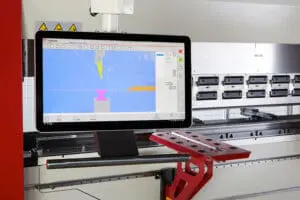
The ESA 875 controller includes a tooling library with multiple directories.
-
Open the tooling editor:
Tap on the tooling icon on the controller screen. -
View directories:
You’ll see several directories containing tooling options.-
The first section shows the tools currently in the working library.
-
Other directories contain additional tooling options, such as Technostamp or Eurostamp tools.
-
-
Loading a tool from a directory:
-
Double tap on the desired directory (e.g., Technostamp).
-
Select the tool you need, such as a 40mm V die.
-
Press Insert and confirm by selecting Yes.
-
The tool will now appear in your working library.
-
This is the simplest way to load tooling, as there are thousands of pre-set tools available from different manufacturers.
Adding Top Tooling
To add a top tool:
-
Tap on the top tool icon to open the top tool library.
-
Select the desired directory, such as Eurostamp.
-
Choose a tool, press Insert, and confirm.
-
The new tool will now appear in the working library.
If you want to rename a tool, you can:
-
Double tap the tool.
-
Select Menu → Save As.
-
Enter a custom name (e.g., “ABC 40mm V 85 Degree”).
-
Press Enter, then OK.
-
Delete the original unmodified tool from the library.
Loading Tooling via Memory Stick
If your ESA controller model does not have built-in directories, you can load tools using a memory stick supplied by Selmach Machinery.
-
Insert the memory stick into the port at the back of the controller.
-
When prompted, close the pop-up window.
-
Open the tooling menu.
-
If you are loading bottom tooling, select the floppy disk icon.
-
Browse the extensive list of tools.
-
If you know the model number of your tool (from a Eurostamp catalogue), you can enter it directly.
-
Select the correct tool and press Save.
-
Return to the tooling list to confirm the tool is now available.
Manually Creating Tooling
If the required tool is not in the directories or memory stick, you can manually create it.
Option 1: New Default Tool
This method uses predefined shapes.
-
Go to the tooling editor.
-
Press once for bottom tooling, twice for top tooling.
-
Select New Default.
-
Fill in the parameters:
-
Width (e.g., 60mm)
-
Height (e.g., 120mm)
-
Angle (e.g., 85°)
-
V size (e.g., 12mm)
-
Distances to edges (e.g., 10mm, 20mm, etc.)
-
Radius (e.g., 1.2mm)
-
Load rating (e.g., 100 tonnes per metre)
-
You can check catalogues or contact Selmach if unsure about specifications.
Option 2: New Drawing
This option allows you to draw tooling from scratch.
-
Select New Drawing.
-
Set overall dimensions (e.g., 60mm x 60mm).
-
Insert features such as:
-
V-shapes (standard or square)
-
Define angles, dimensions, and radii.
-
Example: 10mm square V, 20mm height, 2mm radius.
-
-
Once complete, close the drawing and save it under a custom name.
-
The saved tool will now be available in the library.
Programming Top Tools
Programming top tools is more complex.
The ESA controller offers several “new type” templates:
-
New Type 1, 2, 3: Standard punch profiles with fields for dimensions and reference heights.
-
New Type 4: Radius tooling, where measurements are taken directly from the physical tool.
When entering reference heights:
-
Always measure from the bottom of the tang to the tip of the tool.
-
Add 30mm for the tang, as this is standard on Selmach tooling.
Once all fields are complete:
-
Press Menu → Save As to store the tool in the library.
Tip: Using a memory stick with pre-programmed tooling is far quicker and more reliable than manually programming complex top tools.
Summary of Programming Methods
-
Load from directories (fastest, built-in option).
-
Load via memory stick (if directories are unavailable).
-
Create a new default tool (quick customisation of a standard profile).
-
Draw a completely new tool (full custom tool creation).
For most users, the easiest workflow is to start with directories or a memory stick and only manually draw tools when necessary.
Published 6th October 2025